
Paddle Logger…
I recently had the opportunity to test Paddle Logger for my paddling trips. I happened to see this app on some website and decided to try it out. I was currently using Kayaklog, which I really liked, however they are going through some upgrading to the app and this has been causing a lot of errors. Searching the web, I came across Paddle Logger by David Walker.
The Test Run…
With a paddle planned for Atsena Otie Key, I decided to abandon Kayalog and give Paddle Logger a test run. Initially I found the app a little awkward due to my unfamiliarity with it. I read up on the app online before launching but I was a little confused at the start, when I actually opened the app to use it. let’s take a look at the screens when starting the app and I will go over the details…
Paddle Logger – Get Started…
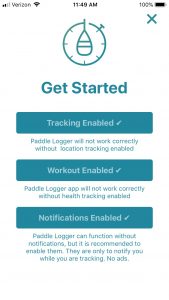
The first time using the app, I was presented with the Get Started screen. This screen offers 3 options…
- Tracking Enabled
- Workout Enabled
- Notifications Enabled
Tracking Enabled has to be chosen or the app will not work correctly without location tracking enabled. I am not sure why this is an option if the app won’t work correctly unless choosing it. I would think it should be the default.
Workout Enabled has to be chosen or the app will not work correctly without health tracking enabled. Again, I am not sure why this is an option if the app won’t work correctly unless choosing it. I would think it should be the default. I didn’t even know what the workout option entails to be able to make this choice.
Notifications Enabled does not have to be enabled and thus the only true option out of the three for a correctly working app.
It took 3 tries to get the app running and not until I checked all the options despite not even knowing how Workout Enabled even works.
The Start Screen…
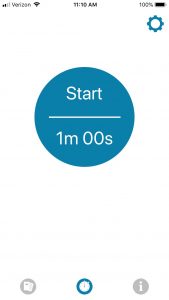
The Start Screen is obviously where the paddle timing and duration begin. Before committing to the paddle however, you will want to visit the preferences to make some adjustments. Clicking on the Cog icon in the top right corner of the Start Screen, will open the Preferences Screen. It is on this screen that there are 4 options to choose from…
- Delay – This is where a countdown can be set, in minutes and seconds, before Paddle Logger begins recording
- Beep – This is where a beep can be set to sound when the recording starts
- Vibrate – Here you can set your phone to vibrate when the recording starts
- Distances -This is the option to choose Km or Miles for the distance data
The lower portion of the Start Screen contains 3 icons. The bottom left is to open the Travel Folders ( which will be explained as we go ), the bottom center Clock icon links to the Start Screen and the bottom right information icon opens the About Screen
When all preferences are set and you are ready to go, tap the start button and Paddle Logger begins logging your trip.
The Travel Screen…
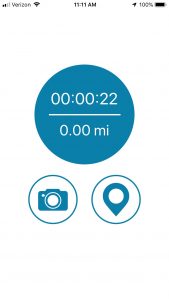
The Travel Screen displays both the duration of the trip as well as the distance paddled. Below the large circle that displays this information are two icons, a camera icon and a location marker icon…
- Camera Icon – Clicking this icon brings up a message asking if the app can have access to your camera. Agreeing to this opens the camera app allowing you to take a picture of anything of interest at that particular time. The app will then store the photo in the Photos app on your phone and return you to the Travel Screen
- Location Marker Icon – When you tap this icon, it marks your current location on the final Route Screen
When tapping on the large circle that is recording the duration and distance, you are given three options. The first option is to pause the session. You may have stopped for a break and do not want to include this time in your total paddle time. You are also given the option to end the session. When you end the session the Trip Details Screen will be displayed. See below.
If you do not want to pause or end your session the final option is to continue tracking.
The Trip Details Screen…
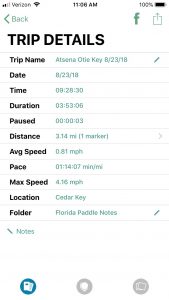
The Trip Details Screen lists all the information collected from your paddle…
- Trip Name – This is editable. Type in the name of your trip
- Date -Recorded on the day of your paddle
- Time – Records the starting time of the paddle
- Duration -The hours, minutes and second of the trip’s duration
- Paused – Records how much time was paused ( for breaks, etc )
- Distance – Shows the total distance paddled along with any set markers
- Avg Speed – Self explanatory
- Pace -Not sure what this is yet
- Max Speed – Self explanatory
- Location – Determines location of paddle
- Folder -This is editable. Name a folder to store this paddle in.
There is also an editable section below these statistics called Notes. Here you can add any information to help journal your paddle.
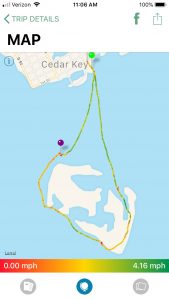
The lower portion of the Trip Details contains 3 icons. The bottom left is to open the Travel Folders which should be highlighted while viewing your paddle details. The bottom center Globe icon links to map detailing the paddle and the bottom right photos icon opens a gallery of any photos taken on the paddle, which can be shared. What I do like about the map is the color coding that details the slowest paddle speed through to the fastest paddle speed and shows on the map where these speeds occurred. The map also displays any location markers that were created along the way. As with most maps there is an option to display in plain view or in satellite view.
When all preferences are set and you are ready to go, tap the start button and Paddle Logger begins logging your trip.
The Trip Folders Screen…
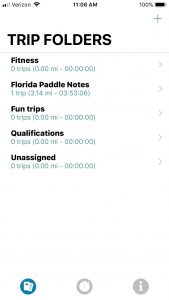
The Trip Folders Screen comes pre-loaded with 4 labeled folders, and the ability to add your own labelled folder as I did here with Florida Paddle Notes
- Fitness – This is editable. Type in the name of your trip
- Florida Paddle Notes -Recorded on the day of your paddle
- Fun Trips – Records the starting time of the paddle
- Qualifications -The hours, minutes and second of the trip’s duration
- Unassigned– Records how much time was paused ( for breaks, etc )
When tapping on any of these folders, a display is opened with a list of paddles placed in that particular folder.
As I said, I like this app. I was impressed with the accuracy on the test run to Atsena Otie Key. Once I became familiar with the app it was very simple to use. I would like to see some weather information in future updates and perhaps real time directions while paddling. Paddle Logger does cost $ 6.99 which I feel is a good price considering I will be using it quite frequently. Check out the Apple Store Preview page for more in depth information about the description and developer.
![]()
